Sometimes all you need is some delicious comfort food to help you get through this crazy life. Given what’s going on in the world right now, I thought I would share a recipe of one of my personal bests- a meal that will hopefully fill your heart with goodness and your stomach with delicious delight. I call it “Matt’s Raspberry Imperial Pot Roast.”
Now I should be upfront about a few things first. I am not a famous chef, nor do I have any professional training. However, I do feel that I am somewhat of a good cook and I am sure that there are parts of this recipe that some may not agree on. But if you give it a try, you will not be disappointed. It is delicious, savory, and gluttonous. It is also a recipe that I have been working on for years, and I think with some recent tweaks, there isn’t much more I want to do to it. So, enjoy and please share this recipe if you love it.
Cast Iron Pot:
Personally, I enjoy cooking with cast iron and I have a cast iron pot that is perfect for this Raspberry Imperial Pot Roast. You can get everything done with this pot. It is also a multi-tasker and can be used for a variety of other cooking applications.
If you don’t have one of these, that is ok. A dutch oven, crock pot, or other larger pot made for your oven will do, and in the recipe, I will suggest how to cook in each.
Prep and Cook Time:
– Roast Prep: A few minutes the night before to season your roast
– Vegetable Prep: 20-30 minutes
– Cast Iron / Dutch Oven Cook Time: at least 4 hours to cook
– Crock Pot Cook Time: 4-5 hours cook time on high, 6-8 hours cook time on low (low cooking preferred)
Ingredients:
- Chuck roast 3 – 5 lbs
- 1 – 2 cans of stout beer (try to find one that is raspberry flavor. I talk more about stouts below)
- Beef broth
- 3 yellow onions
- 1 baking potato cut into 1 ½” pieces
- 1 – 2 cups cut carrots (about 1 – 1 ½” long) or buy a bag of baby carrots
- 1 pack of white mushrooms (do not use shiitake mushrooms as they get really slimy)
- 1 – 2 minced garlic cloves
- 2 tbsp Worcestershire Sauce
- 2 Bay leaves
- Salt and Pepper
- Flour
The Can (or Two) of Stout:
The beer is what makes this recipe great, and I think it’s important that you use a higher alcohol content stout. Guinness is ok, but if you want better flavor, I suggest you go to a liquor store that has a great selection of Russian or American Imperial Stouts. Imperial stouts have a higher alcohol content and give that flavor profile a boost. Also, these imperial stouts come in a lot of different flavors. From peanut butter chocolate, to blueberry vanilla and everything in between. I use a raspberry imperial stout because, “
Holy Tintinnabulation Batman!” it’s the best pot roast I have ever made with a stout.
The beer that I used is called “So Dreamy” which is from the Minneapolis brewery,
Able Seedhouse and Brewery. It’s an imperial stout with chocolate, raspberry and vanilla. The beer itself is pretty sweet with a full flavor profile, and I had a couple extra cans that I saw a great opportunity for this recipe. Oh, and don’t worry, your roast will not be overpowered with raspberry taste, but it is there (and fricken delicious).
Imperial stouts are more of a seasonal beer, but some that are usually around all year include Darkness (
Surly), Barrel-Aged Narwhal (
Sierra Nevada Brewing Co.), Old Rasputin Russian Imperial Stout (
North Coast Brewing Co.), and many more. Call ahead to a liquor store that specializes in craft brews and I am sure they will have something for you.
You can also use regular stouts. I encourage you to find one that has a raspberry component to it. You really can’t go wrong with any regular stout either. Ask the Irish and they will tell you!
Lastly, don’t get too crazy if you decide to go with another fruit flavor. Think of it like eating fruit as a side with your regular pot roast. Does banana blueberry mango go with pot roast? I’m not sure it will, but if you try it and it is awesome, let me know!
Overnight Prep:
For the roast, try and find one that has some good fatty marbleizing to it. Fat is important here. During the cooking process, the fat breaks down and provides that tender, cut-with-a-fork consistency. It also adds to the flavor of your roast and helps stick to your ribs. 😉
To prep your roast, it must be thawed. My recommendation is to buy your roast the night before and sprinkle the roast with a fair amount of kosher salt on all sides (about ½ – 1 tsp per side), then set it back into your refrigerator covered with plastic wrap, parchment paper, a bag or some tin foil. By morning, the salt granules will be sucked inside the roast, which adds flavor and helps with keeping moisture inside. If you don’t have the night before to prep, salt at least 1 hour before starting cooking.
Also to note, depending on what cooking device you are using, you will need time. For a cast iron pot or dutch oven, you should start preparing at least 4 hours in advance of when you want your meal. For cooking in a crock pot on high, give yourself 4-5 hours. On low, plan on around 6-8 hours depending on how tender you want your roast.
Cooking Instructions:
Pull your roast from your refrigerator, uncover and set on the counter until it gets to room temperature, about 30-60 minutes. While your roast is warming to room temperature, you will want to first focus on the onions because they take some time.
Caramelizing the Onions:
3 yellow onions seems like a lot, but our goal is a rich, caramelization which will bring down the volume of the onions in your dish, but will provide that sweet, savory taste.
First cut off the bottom and tops of your onions. Remove the first layer of onion, and discard. Cut from the top of the onion down into 6 equal sections for each. Add oil to your cast iron or dutch oven and set your burner to medium (use a separate pan or skillet if you are using a crock pot). Add onions and about ¼ – ½ tsp of kosher salt. Cook at medium heat until the onions are a consistent deep golden brown. If you start to see charring on your onions, back off on the heat. It’s important to slowly caramelize them. This should take around 15-20 minutes and you can prep the rest of the vegetables in the meantime. Once the onions are caramelized, remove them from the pot (or skillet) and set aside in a bowl. Do not remove any of the juice or excess onion scraps from your pan. You want that for searing your roast to add flavor.
Vegetables:
You may have noticed that I didn’t include celery in my list of ingredients. That’s just me. I’m a fan of celery, but I don’t think its taste is right for this meal. Feel free to add celery to this recipe if you’d like though. It’s not going to hurt it.
For your vegetables, there is really no rule on the vegetable mix ratio, so go ahead and add what you would like in here. I personally like an even mix of vegetables. If you like more potato than other vegetables, go for it! The only thing that I would recommend is that you keep your vegetables large. You will be cooking this for a long period of time, so having bigger vegetables in the mix will help with things not falling apart (like the potatoes). I recommend cutting your potatoes in 1 to 1 ½ inch cubes. Carrots cut into 1 -1 ½ inch lengths (or using a bag of baby carrots). For the mushrooms, I buy the medium sized mushroom pack and keep the mushrooms themselves whole.
Browning Your Roast:
Once your roast is at room temperature, you will want to pepper it (about 1/2 – 1 tsp per side) and then dust it with all purpose flour. In the pot (or skillet) you used earlier, crank that burner to high. You are looking to get a good sear to your roast which helps lock in flavor and moisture. Sear every side of the roast, including the fat side. You are looking for a medium to dark brown sear. I recommend pulling your roast off after each side and waiting for a couple minutes to help get your pan back up to a good searing temperature.
Adding Everything Together:
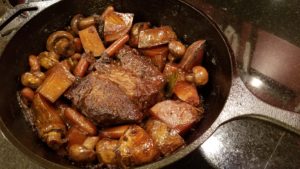
Roast all browned up? Great! Place that roast in your pot ( or dutch oven/crock pot) and surround it with the caramelized onions. Then add your bay leaves, garlic, and vegetables. For the vegetables, use only enough of them to fill the sides of your pot and be a little bit higher than your roast.
Then add 2 tbsp of Worcestershire sauce and crack open that can of stout (or two). Your goal here is to pour enough stout into your pot so that it goes three quarters (¾) of the way up the side roast. Then top it off with beef broth so that your roast is covered- but not much further! Like ¼ of an inch above your roast. Your vegetables can be above the liquid line because the heat and steam of cooking is going to cook them up really good. Trust me!
Cooking Time:
There are a lot of factors that come into play when you are trying to get a tender and moist roast. I have had plenty of times in my life where my pot roast was tender, but dry to taste. One thing I learned half way through my pot roast cooking life is that fat is key to tenderness and moisture. That is why I mentioned earlier that you want a roast with good caramelization. Also, temperature is really important. The fat that holds the muscle strands together begins to break down once the meat is around 212° Fahrenheit. Taking time to get there is also important. Once you are there, you shouldn’t cook it too long after that because the fat starts to get stripped away, giving that dry taste to a fall apart roast. So that is why I mention below to test for tenderness about every hour.
If you are using a cast iron pot like mine or a dutch oven, cook it in the oven at 375° F for 1.5 hours, then reduce heat to 300° F and check every hour for meat tenderness by sticking a fork into a thicker portion of it and twisting slightly to see if the connective fat tissues have started to melt and make your roast tender. This should take around 3 hours.
If you are using a CrockPot, cook on high for 2-4 hours until the meat is tender (start checking at the 2 hour mark), or on low for up to 8 hours, checking the tenderness of meat every hour starting around 4 hours.
Once you have reached the desired tenderness close to the center of your roast, pull it out of the oven (or turn off your crock pot) and let it rest for 5-10 minutes covered.
The liquid in your pot should now be about half way up after soaking into the vegetables and evaporating. Save that liquid! You can make a gravy with it- but I bet you money that if you just use it over your plated pot roast goodness, that will be plenty enough!
Ok, now make sure you are fully seated when you take the first bite. If you taste tested it beforehand, shame on you! Do you not trust me? 😉 Ok, take that first bite. I hope you love it as much as I do!!
Oh, and please share this recipe with your family, friends, and on all the social media places you enjoy sharing things.


